Getting Started
What is RemindPay? expand_more
Tracks bills, subscriptions, and warranty cards in one place, with reminders before due dates and warranty expirations, so users never miss a payment or lose coverage.
How do I add my devices and bills? expand_more
Adding a bill takes seconds: tap the + button in the bottom tab bar, enter the name, amount, due date, and other details, and you're done. RemindPay handles the rest, reminding you before every payment is due.
Which Apple devices does RemindPay support? expand_more
RemindPay runs on iPhone and Apple Watch, with your bills and reminders synced between them.
How do I manage my warranty cards? expand_more
Tap the shield icon at the top right of the app to open your warranty cards. From there you can add new cards, review the ones you have, and keep track of their expiry dates.
What can I do without Premium? expand_more
The free version lets you add and track a limited number of bills with reminders included, so you can try everything before upgrading. A one-time payment unlocks unlimited bills, warranty cards, and all Premium features with no subscriptions.
Reminders
I'm not receiving reminders. What should I check? expand_more
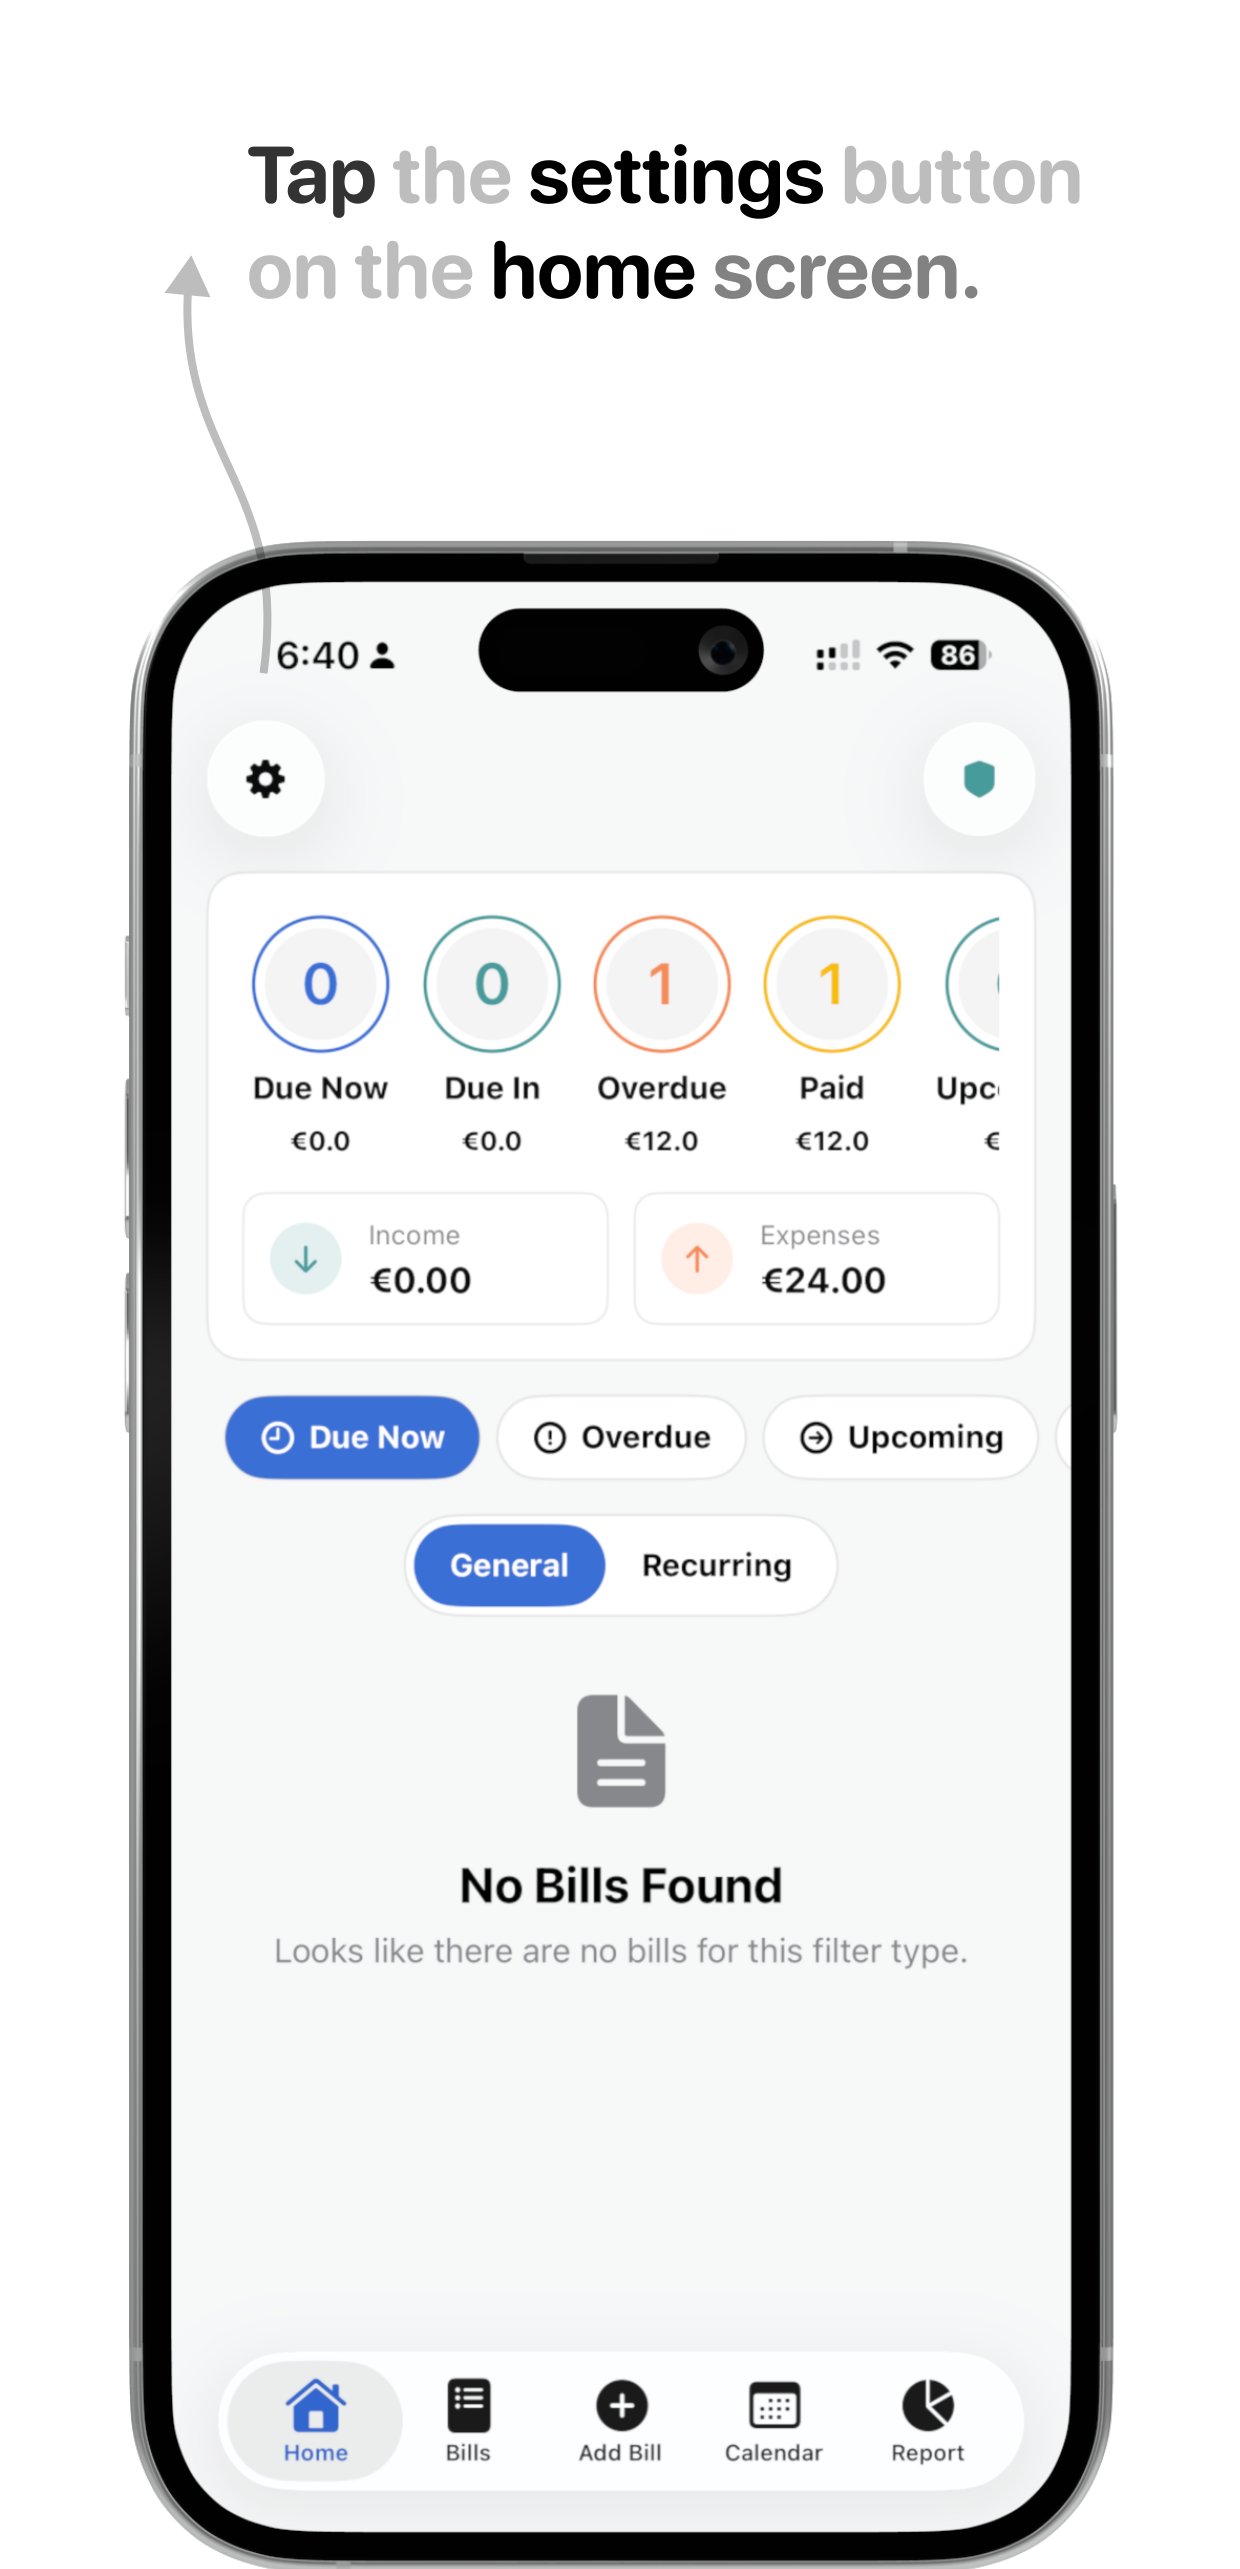
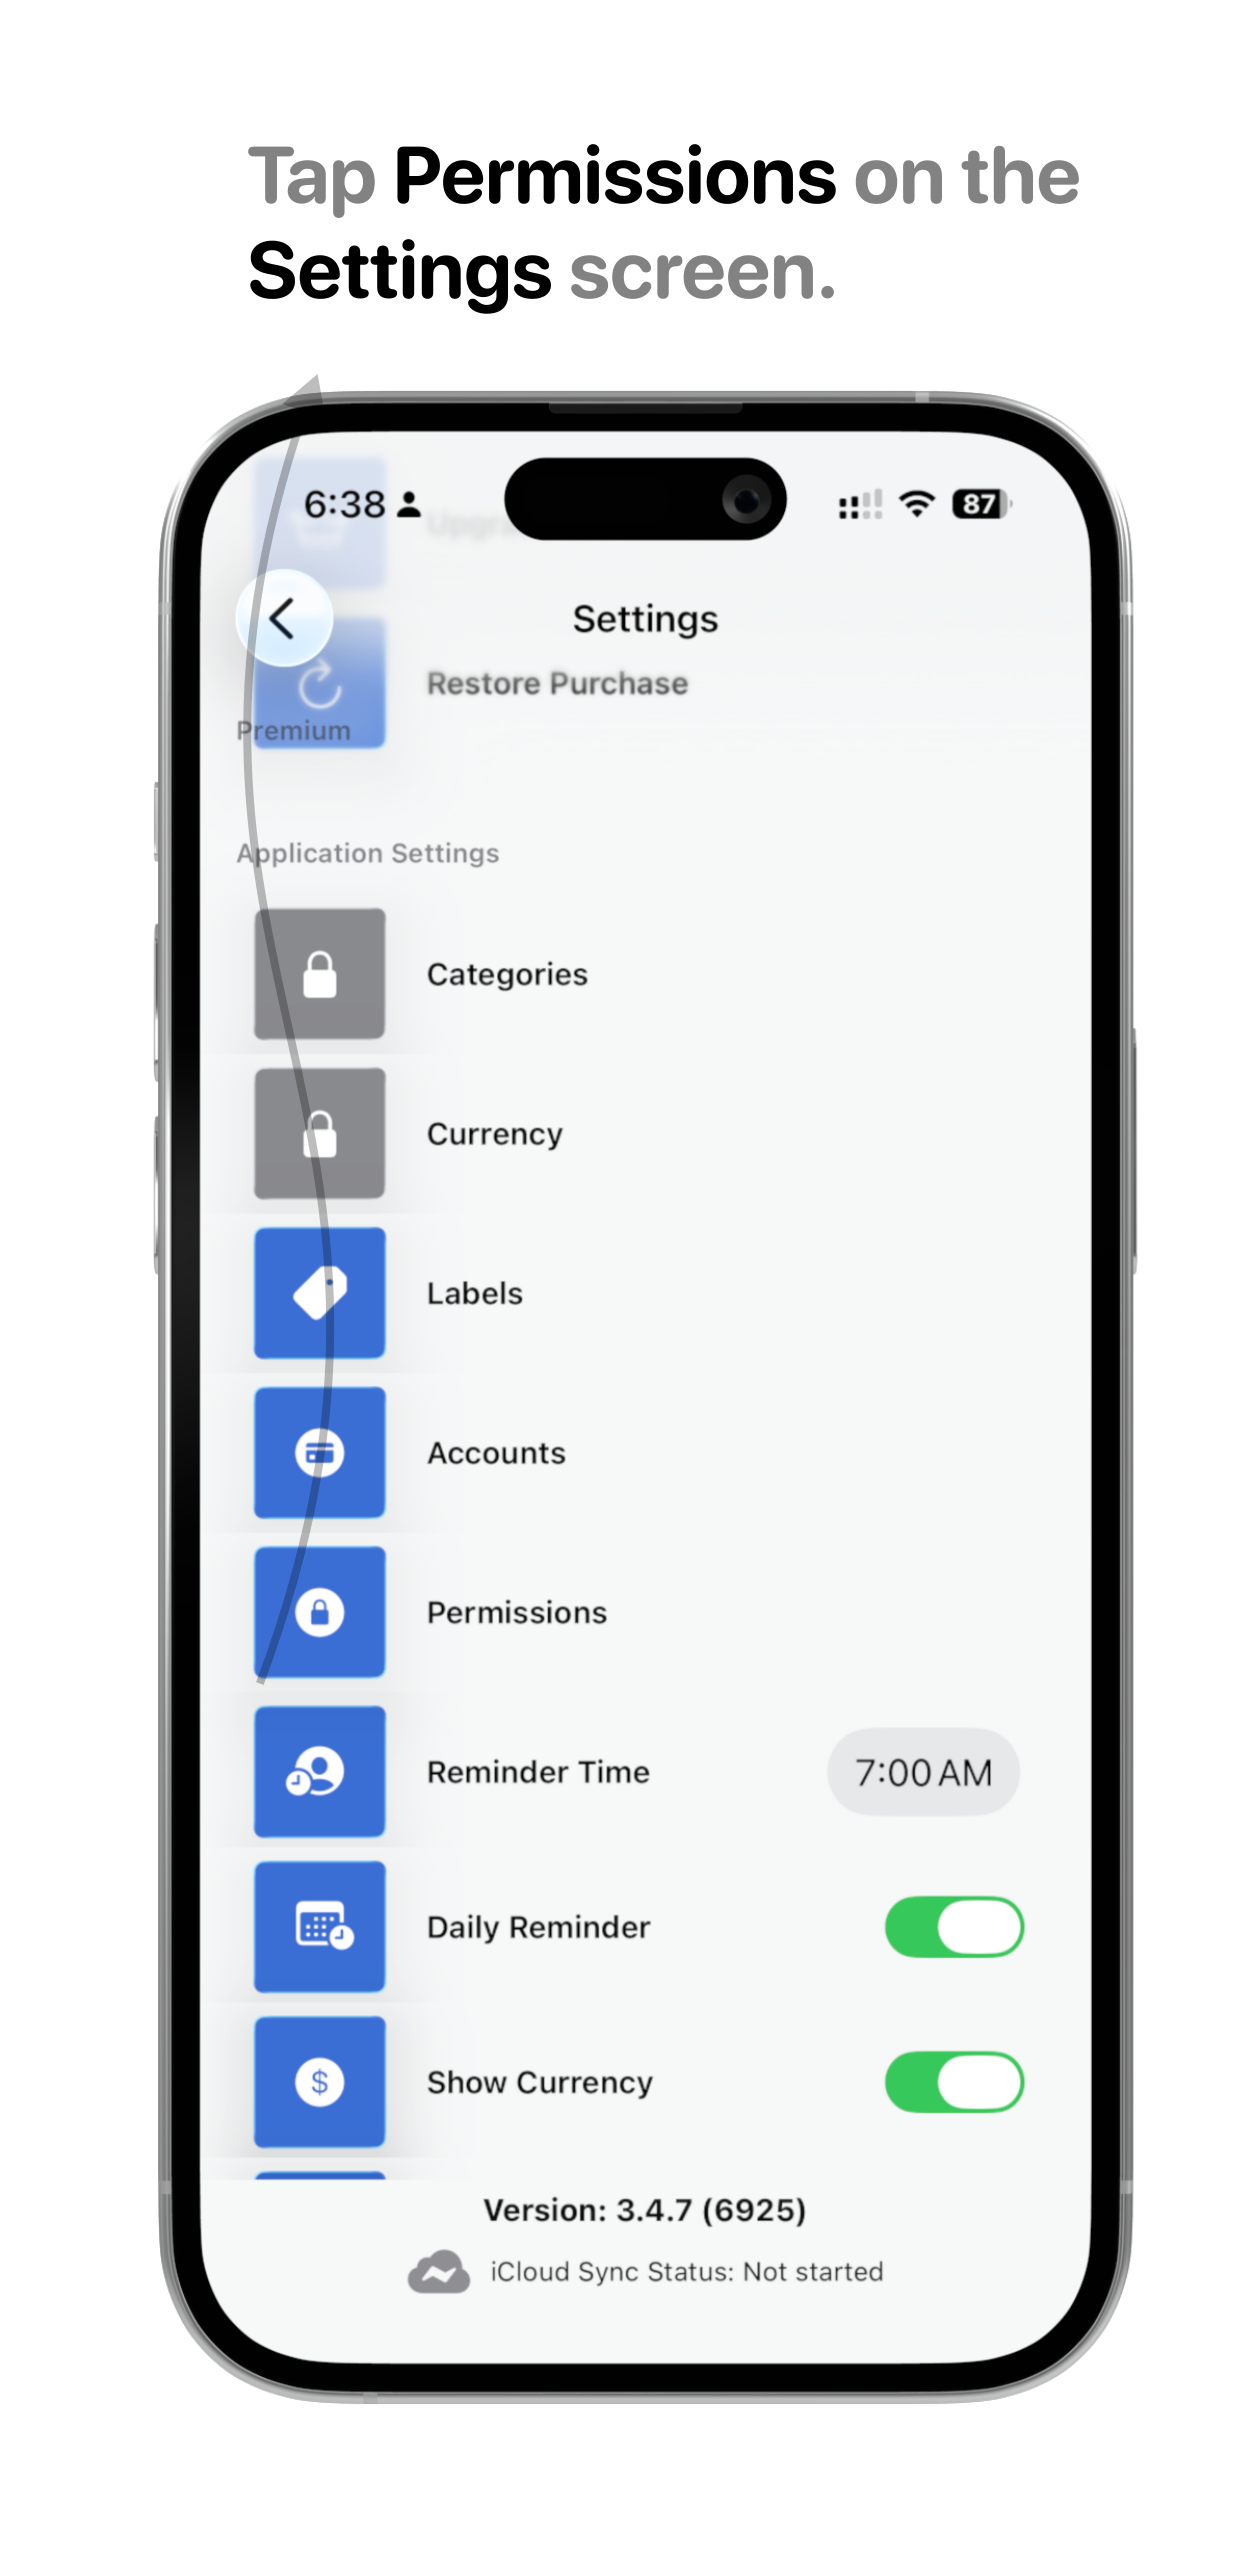
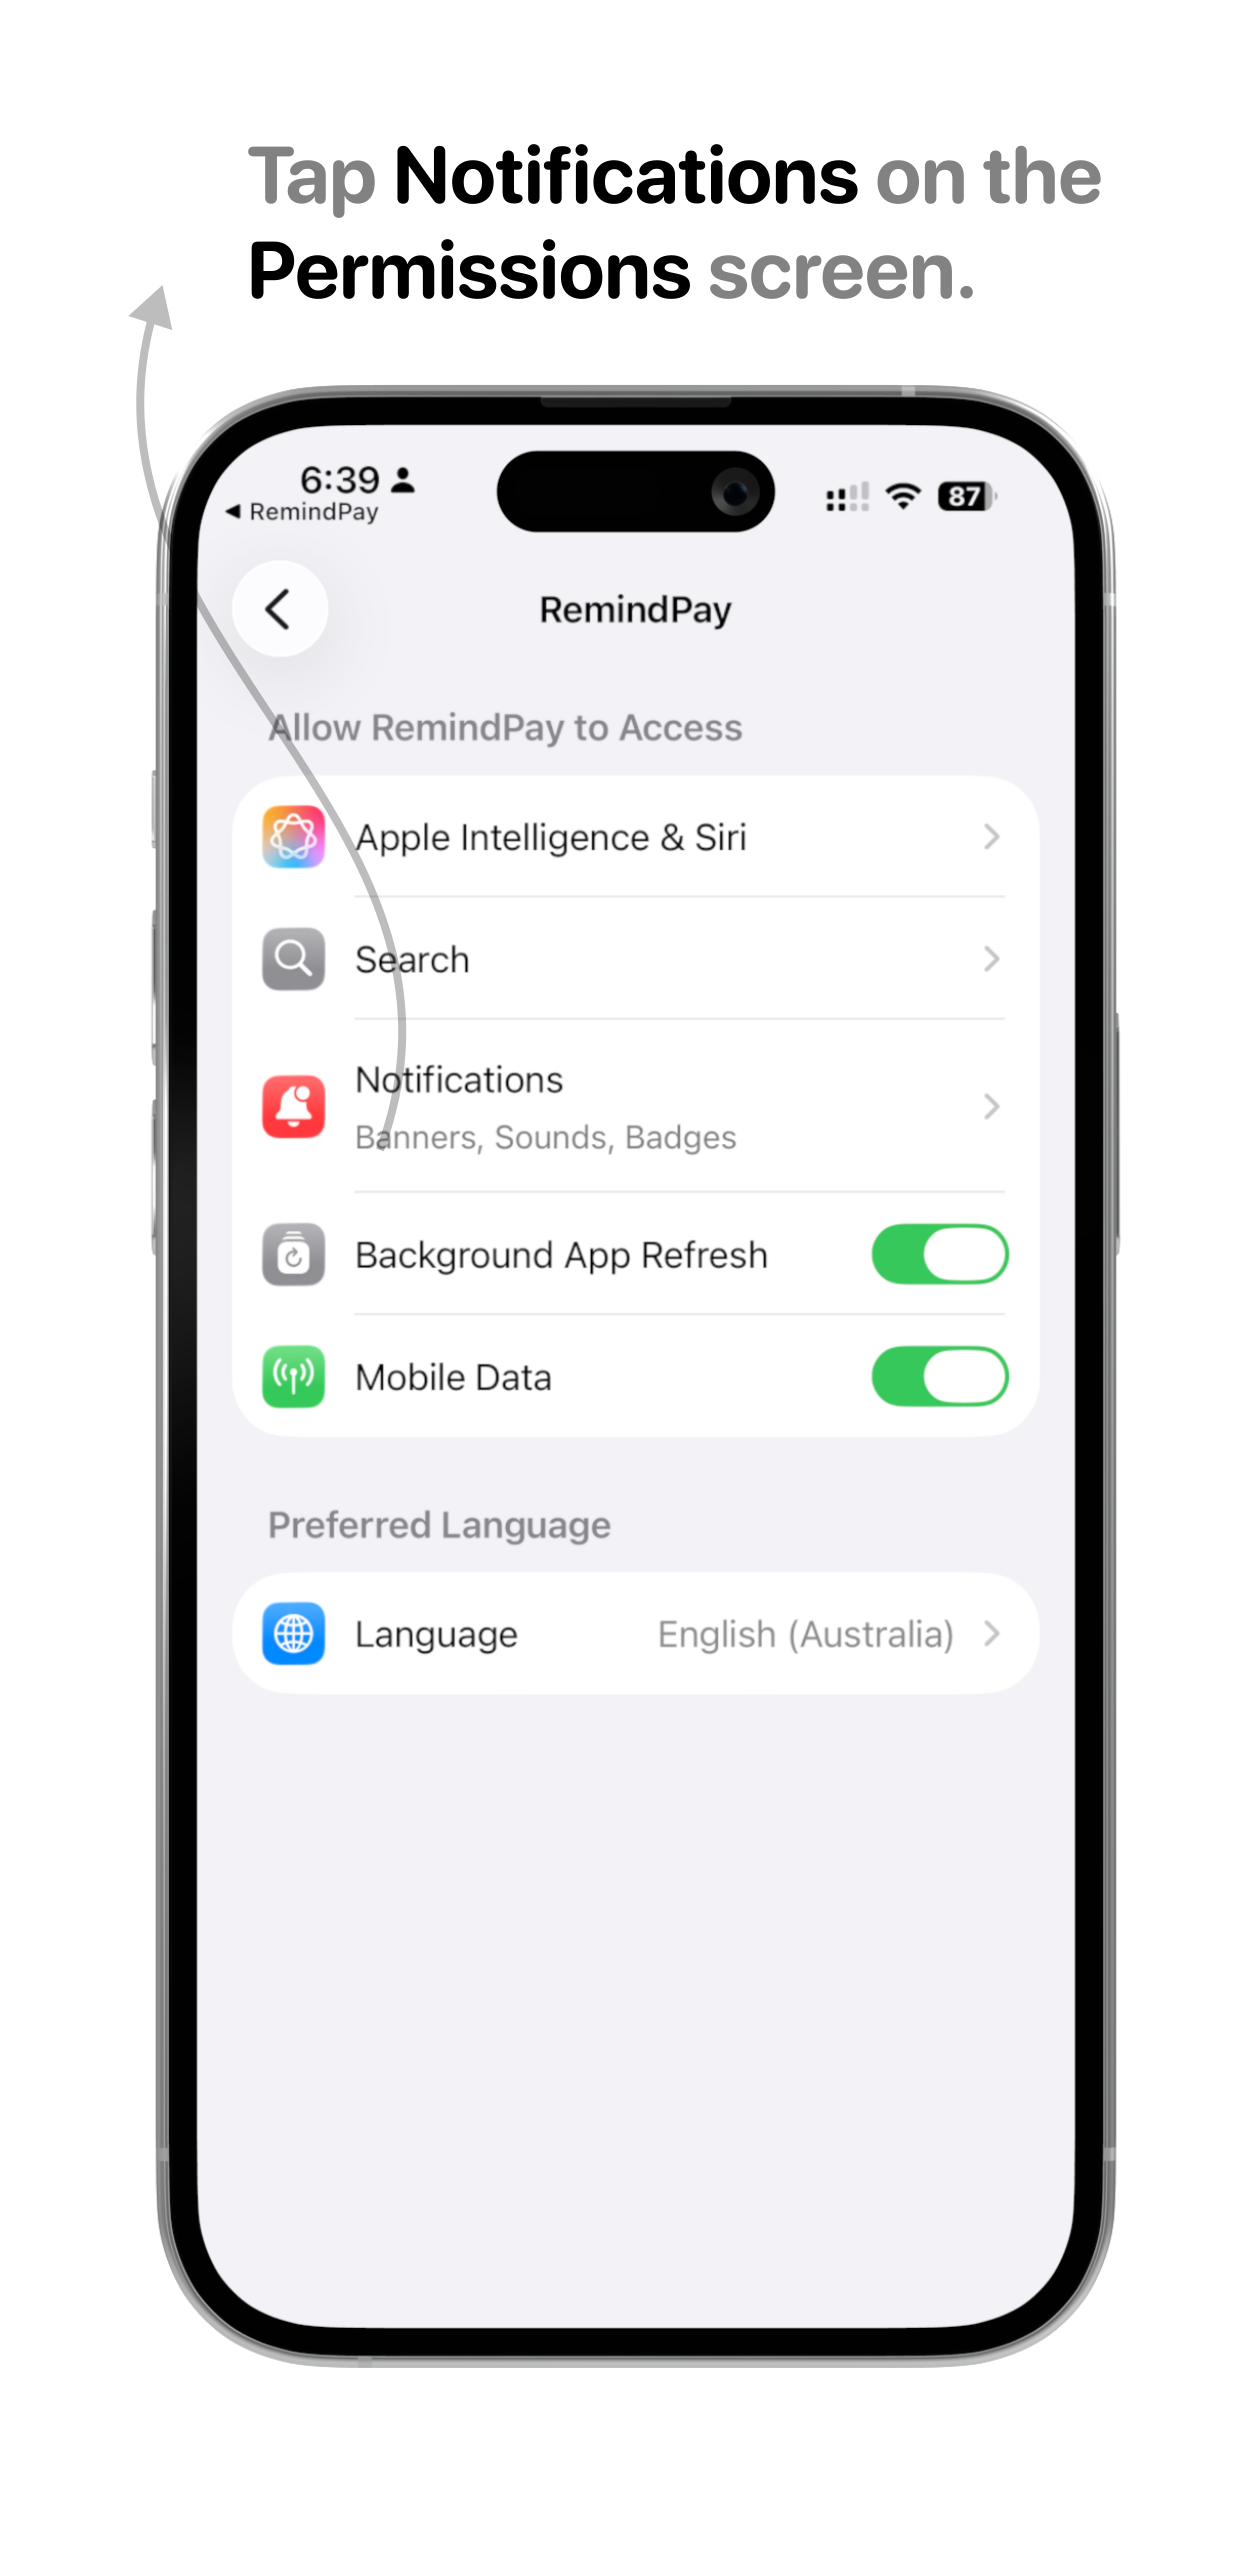
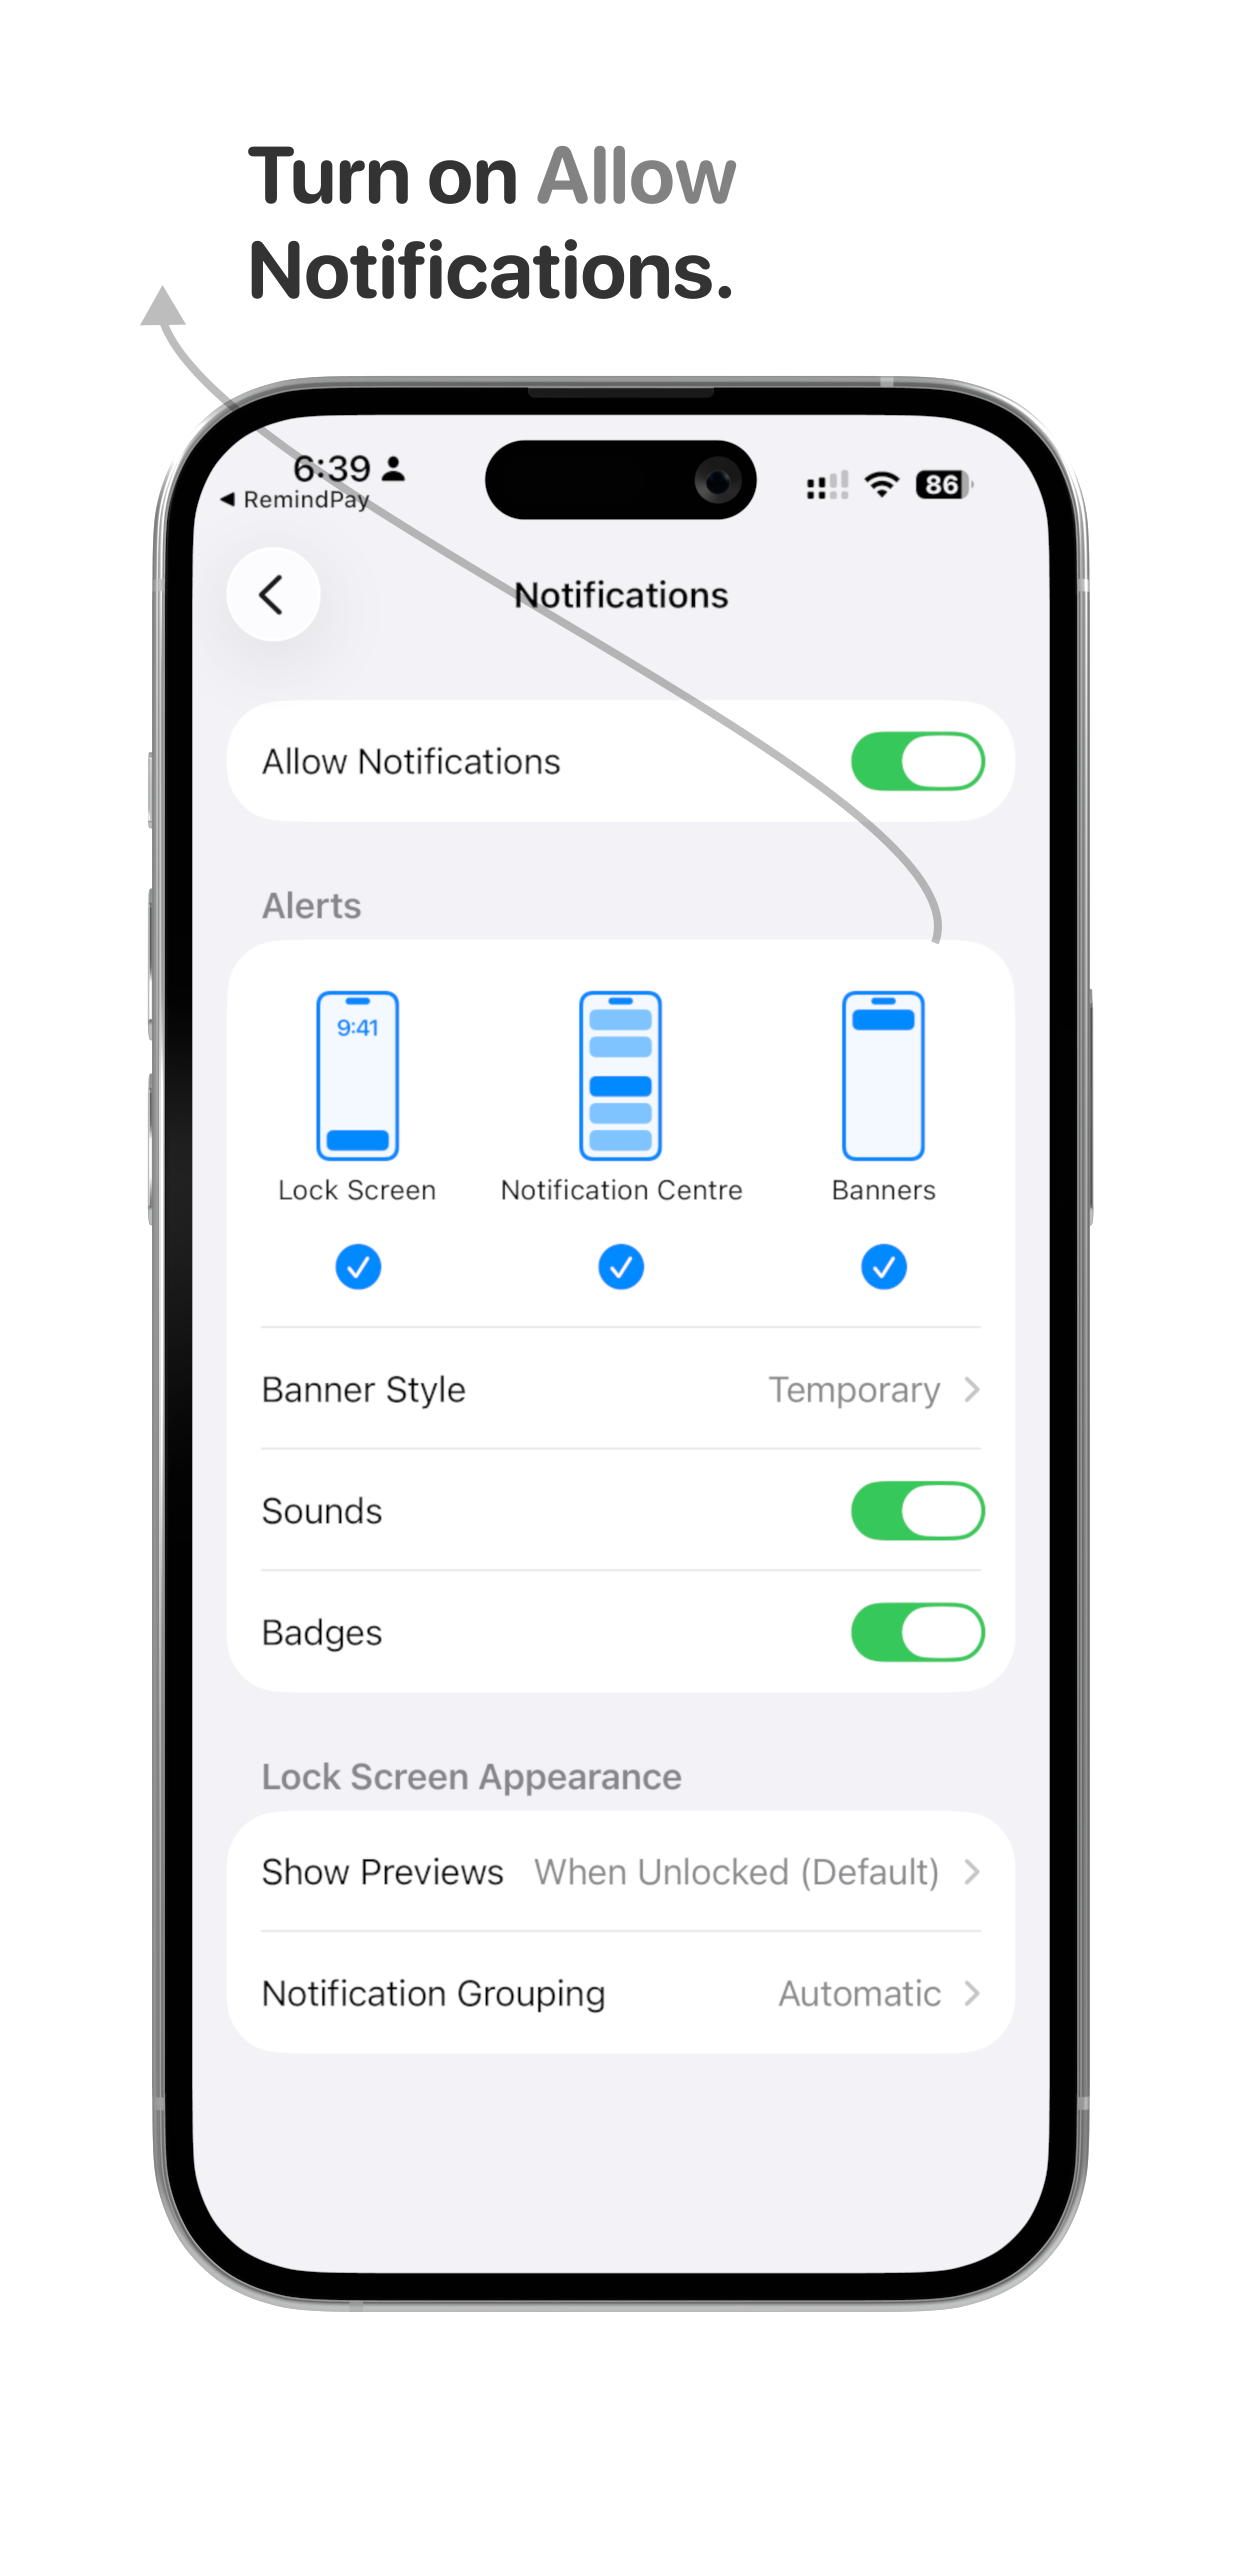
Notifications are most likely turned off. Tap the gear icon at the top left of the app, go to Permissions > Notifications, and make sure Allow Notifications is turned on.
Can I customize when I get notified? expand_more
Yes. In the Settings page you can choose what time of day notifications arrive, and how far in advance you're reminded: 1 or 3 days before, or 1 or 2 weeks ahead of the due date.
What if I miss a reminder? expand_more
Use the Overdue filter on the home screen to see which bills are past their due date, then mark them as paid or update the due date.
Warranty & Billing
Will RemindPay tell me before my warranty expires? expand_more
Yes. RemindPay sends you a notification 30 days before a warranty expires, at your preferred reminder time, so you have time to act while the coverage still counts.
Can I upload receipts or purchase proof? expand_more
Yes. Attach a photo or PDF of any receipt to a bill or device entry. It is stored securely with that item for whenever you need it.
Security & Privacy
Is my payment and account information safe? expand_more
Yes. Your data is stored in your own iCloud account and never sent to any third-party servers. It stays private between your devices.
Does RemindPay ever move my money? expand_more
No. RemindPay only tracks and reminds. It never initiates payments, transfers, or has the ability to move your money.
Can I delete my data at any time? expand_more
Yes. Delete individual bills or warranty cards any time, and the app's Settings page lets you remove all your bills and custom categories in one go. Since everything lives in your own iCloud account, you can also wipe all RemindPay data through your iCloud settings.
Integrations
How do I add the RemindPay widget to my Home Screen? expand_more
The RemindPay widget shows your upcoming bills at a glance, right on your Home Screen. Follow these steps to set it up:
-
1
Long-press on your Home Screen
Touch and hold any empty area until the app icons start to jiggle and a toolbar appears at the top.
-
2
Tap the "+" button
The plus icon appears in the top-left corner of your screen. Tapping it opens the widget gallery.
-
3
Search for "RemindPay"
Type RemindPay in the search bar at the top of the widget gallery to find the app instantly.
-
4
Tap the RemindPay result
A preview screen appears showing the available widget styles and sizes.
-
5
Choose a widget size
Swipe left or right to pick Small, Medium, or Large. The larger the widget, the more upcoming bills it shows at once.
-
6
Tap "Add Widget"
The widget is placed on your Home Screen. Drag it to any position you like.
-
7
Tap "Done"
Your upcoming bills now appear on your Home Screen every time you unlock your iPhone, without opening the app.
How do I add a bill using Siri? expand_more
You can add a bill to RemindPay hands-free by asking Siri. Here's how:
-
1
Make sure Siri is enabled
Go to Settings, then Siri & Search, and make sure Siri is turned on.
-
2
Activate Siri
Press the Side button or say "Hey Siri" to open Siri.
-
3
Say "Add a bill in Bills Keeper"
Siri recognises the RemindPay app and opens the bill creation flow.
-
4
Say or type the bill name
Siri will ask for the bill name. Speak it or type it when prompted.
-
5
Enter the amount and due date
Follow the prompts to fill in the amount and when the bill is due.
-
6
Bill saved
Your bill is saved instantly. No need to open the app.
How do I add a recurring bill using Siri? expand_more
For bills that repeat on a schedule, tell Siri to add a recurring bill and RemindPay takes care of the rest:
-
1
Make sure Siri is enabled
Go to Settings, then Siri & Search, and make sure Siri is turned on.
-
2
Activate Siri
Press the Side button or say "Hey Siri" to open Siri.
-
3
Say "Add a recurring bill in Bills Keeper"
Siri opens the recurring bill flow in RemindPay.
-
4
Say or type the bill name
Siri will ask for the bill name. Speak it or type it when prompted.
-
5
Enter the amount, repeat schedule, and start date
Follow the prompts to set how often the bill repeats (weekly, monthly, etc.) and when it starts.
-
6
Recurring bill scheduled
Your recurring bill is set up automatically. RemindPay handles all future reminders.
How do I set up Bills Keeper on Apple Watch? expand_more
Get Bills Keeper on your wrist in a few taps so your upcoming bills are always a glance away:
-
1
Open the Watch app on your iPhone
Launch the Watch app — this is where you manage everything installed on your Apple Watch.
-
2
Find Bills Keeper under Available Apps
Scroll down past your installed apps to the Available Apps section and locate Bills Keeper.
-
3
Tap Install
Tap Install next to Bills Keeper and wait a moment for it to sync to your Apple Watch.
-
4
Open Bills Keeper on your Apple Watch
Once installed, open Bills Keeper on your Watch to see your upcoming bills at a glance.
How do I set up Apple Pay auto-logging? expand_more
Automatically log your payments in Bills Keeper after every Apple Pay transaction using a Shortcuts automation:
-
1
Open the Shortcuts app on your iPhone
The Shortcuts app comes built in to iOS. Search for it in Spotlight if you can't find it.
-
2
Go to the Automation tab
Tap Automation at the bottom of the screen.
-
3
Tap the "+" button to create a new automation
This opens the list of triggers you can automate.
-
4
Select Wallet as the trigger
Choose your card and categories, then select Run Immediately so the log happens without a confirmation prompt.
-
5
Press Next
This takes you to the action step where you choose what happens after each Apple Pay payment.
-
6
Select Bills Keeper and choose "Log Apple Pay Payment"
Tap Done to save. From now on, every Apple Pay transaction is logged in Bills Keeper automatically.
Support & Contact
How do I contact support? expand_more
Tap Help in the app to reach our team directly, or email rintoandrews90@gmail.com. We typically reply within a few hours.
I found a bug. Where do I report it? expand_more
Send an email to rintoandrews90@gmail.com with a short description and a screenshot if you can. We read every report.
Do you offer refunds? expand_more
Purchases are handled by Apple, so refunds go through the App Store. Visit reportaproblem.apple.com, sign in with your Apple ID, and request a refund for your RemindPay purchase. Apple usually responds within a day or two.
How do I restore my purchase? expand_more
If you've reinstalled the app or switched to a new iPhone, tap the gear icon at the top left, then choose Restore Purchases. Sign in with the same Apple ID you used to buy Premium and your upgrade comes right back, free of charge.
Known Issues
If I uninstall and reinstall RemindPay, will my notifications and calendar events come back? expand_more
Your bill data syncs back automatically via iCloud once you reinstall. However, scheduled notifications and calendar events are not restored. They live locally on your device and are permanently removed when the app is uninstalled.
After reinstalling, open each bill and re-save it to reschedule its notifications. Calendar events will need to be added again manually from within the app.